Call 01202 43 43 40
Email info@mesmo.co.uk
Here is a little know time management tip for arranging external meetings using Microsoft Outlook. Email part of your calendar to those with whom you are arranging a meeting instead of laboriously typing out a list of dates and times etc. The email will just show the availability. Here is how to execute this time management tip using your Microsoft Outlook Calendar.
 2. From the pop-up menu Send Calendar via E-mail, complete the box as required by selecting the Date Range, eg Next 7 Days. You will see it only shows Free, Busy, Tentative etc. There is no fear of disclosing what is happening on busy days.
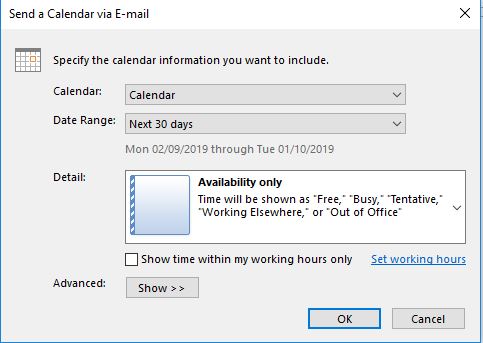
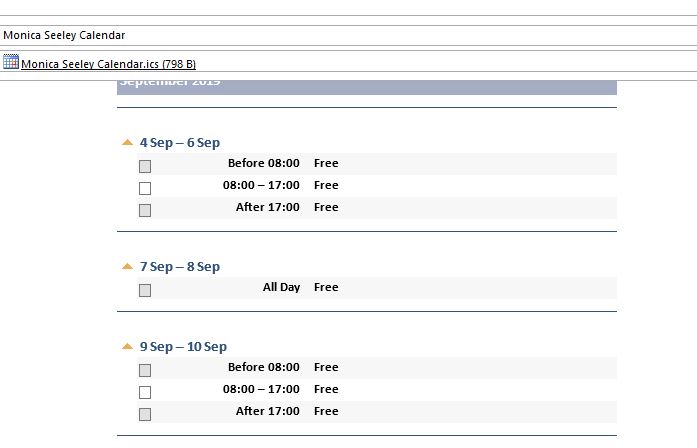
When complete click OK and the selected portion is automatically dropped into the body of email as show below.
Put all the names in the Bcc box to stop the endless rounds of Reply All emails. Then only you get all the responses and can decide on the best date. Just another tip to save time and reduce email overload as everyone plays email ping-pong back and forth with dates.
If you like this tip, it is just one of many which we cover in our Smart Email Management workshops. Why not contact us now to book one for you and your colleagues?
Tags: bcc, Meeting management to save time, Outlook calendar management, Reduce email overload, Time management

Effective email management – a new series of videos with top tips on effective email management and etiquette. These will enable you to save time and raise performance. Each is about 45 second long and focused on one simple action you can take to improve your well-being and mental health by reducing email overload.
Don’t forget you can always benchmark your email etiquette. Click here to start.
To check your your email management click here to see if there is scope to save time.
2. The Greeting. Casual or formal? What is the best email etiquette for business emails?
3. The closure. Casual or formal? What is the best email etiquette for business emails?
4. Thank you emails. Should you send them or do they just raise the current email overload factor? What’s the alternative?
5. Calendar management. How to deal with unexpected meeting invites in order to better manage your time.
6. Think Before Hitting Send. Top tips to save yourself time and improve compliance with GDPR
7. Quiet Email – the effective way to gain the recipient’s attention without shouting and using high priority markers etc.
8. Think Five. Five top tips to improve productivity and save time dealing with email by sending the right message right first time.
Watch this space for more each month.
Tags: Calendar management, Effective email etiquette, Effective email management, email etiquette, Email greetings, Email management to improve well-being, email overload, email sign off, Email thank you, GDPR, Mental Health and Email, Quiet Email, Save time dealing with email, Smart Email Management, Subject-line, Top tips
How to improve your time management and meeting management with the Outlook Schedular and reduce email overload. You’ve been tasked with organising a meeting with several attendees, let’s say 6. You set up a meeting and send it out without checking whether everyone can actually come! Now you end up with 5 responses telling you that either they are unavailable or would like to propose a new time. Needless time and energy wasted and frustration. Not only that, you have to keep track of all the responses and you really don’t have time for that!
Using Microsoft Outlook, the Outlook Scheduling Assistant makes it easy to manage your time and the meeting. It enables you to create meetings at the best time for all attendees ( assuming they are all at the same organisation) and easily track who has replied and more importantly what they replied. No need to trawl through your Inbox to see who has answered or remember to jot down the responses as they come in.
Set up the meeting and check attendees availability using the Scheduling Assistant and as soon as a reply arrives it is noted – you can see those replies all in one place too. Not only that, you can paste those replies into a Word Table or an Excel Spreadsheet as a checklist for the meeting.
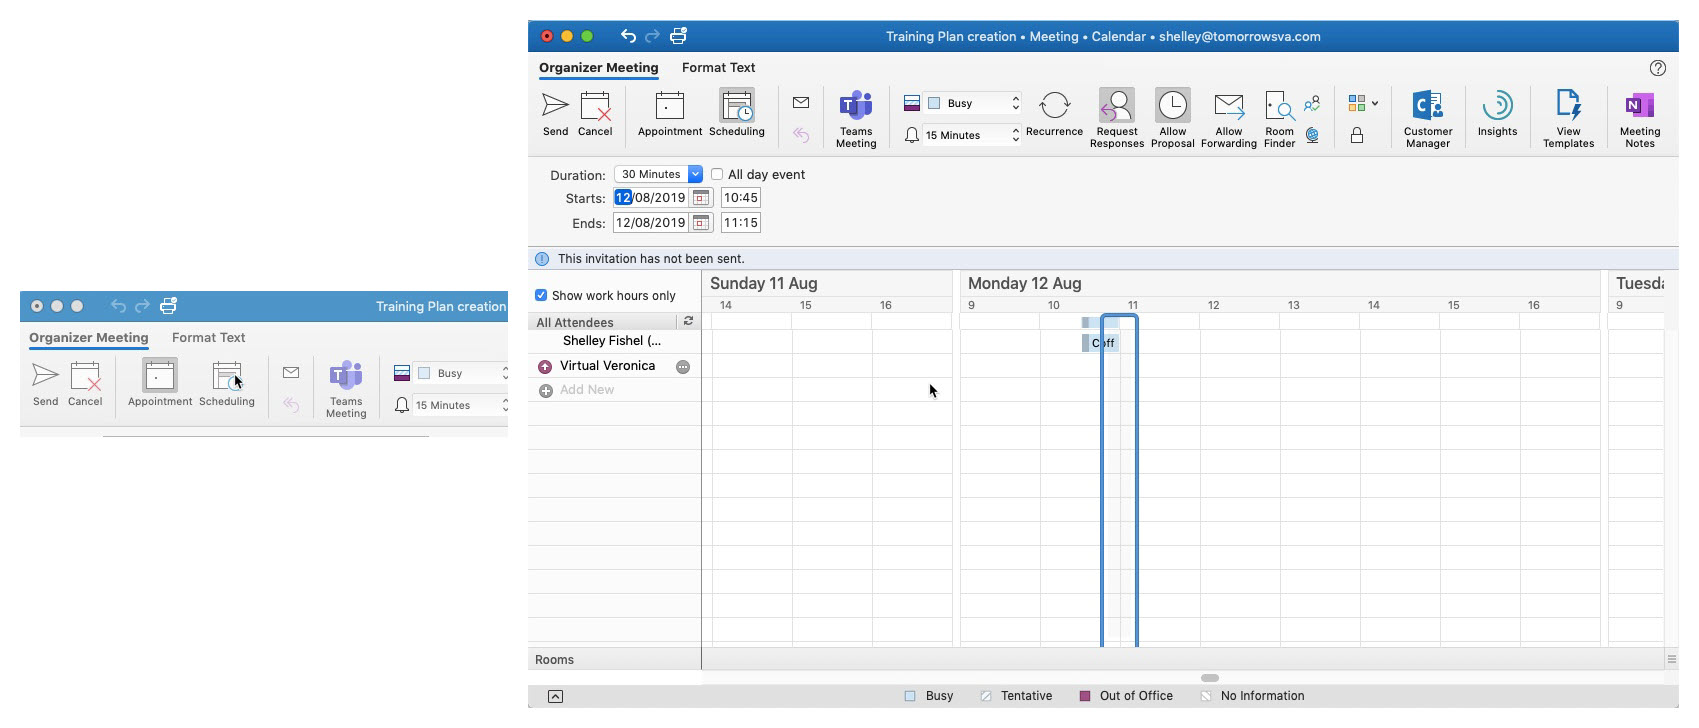
There is more functionality in Outlook 2016/Office365 on the Windows platform. The Scheduling Assistant does exist in the Mac version, however there is less advanced functionality as we will see.
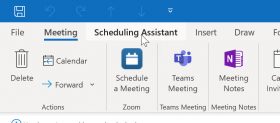
To get to the Scheduling Assistant first set up a meeting request. In the Calendar click on the New Meeting Icon and add the people you wish to invite. Set up the date and time and the topic of the meeting along with any notes you want to add in the body of the meeting such as the Agenda or any special instructions. Then click on the Scheduling Assistant Ribbon at the top of the screen:
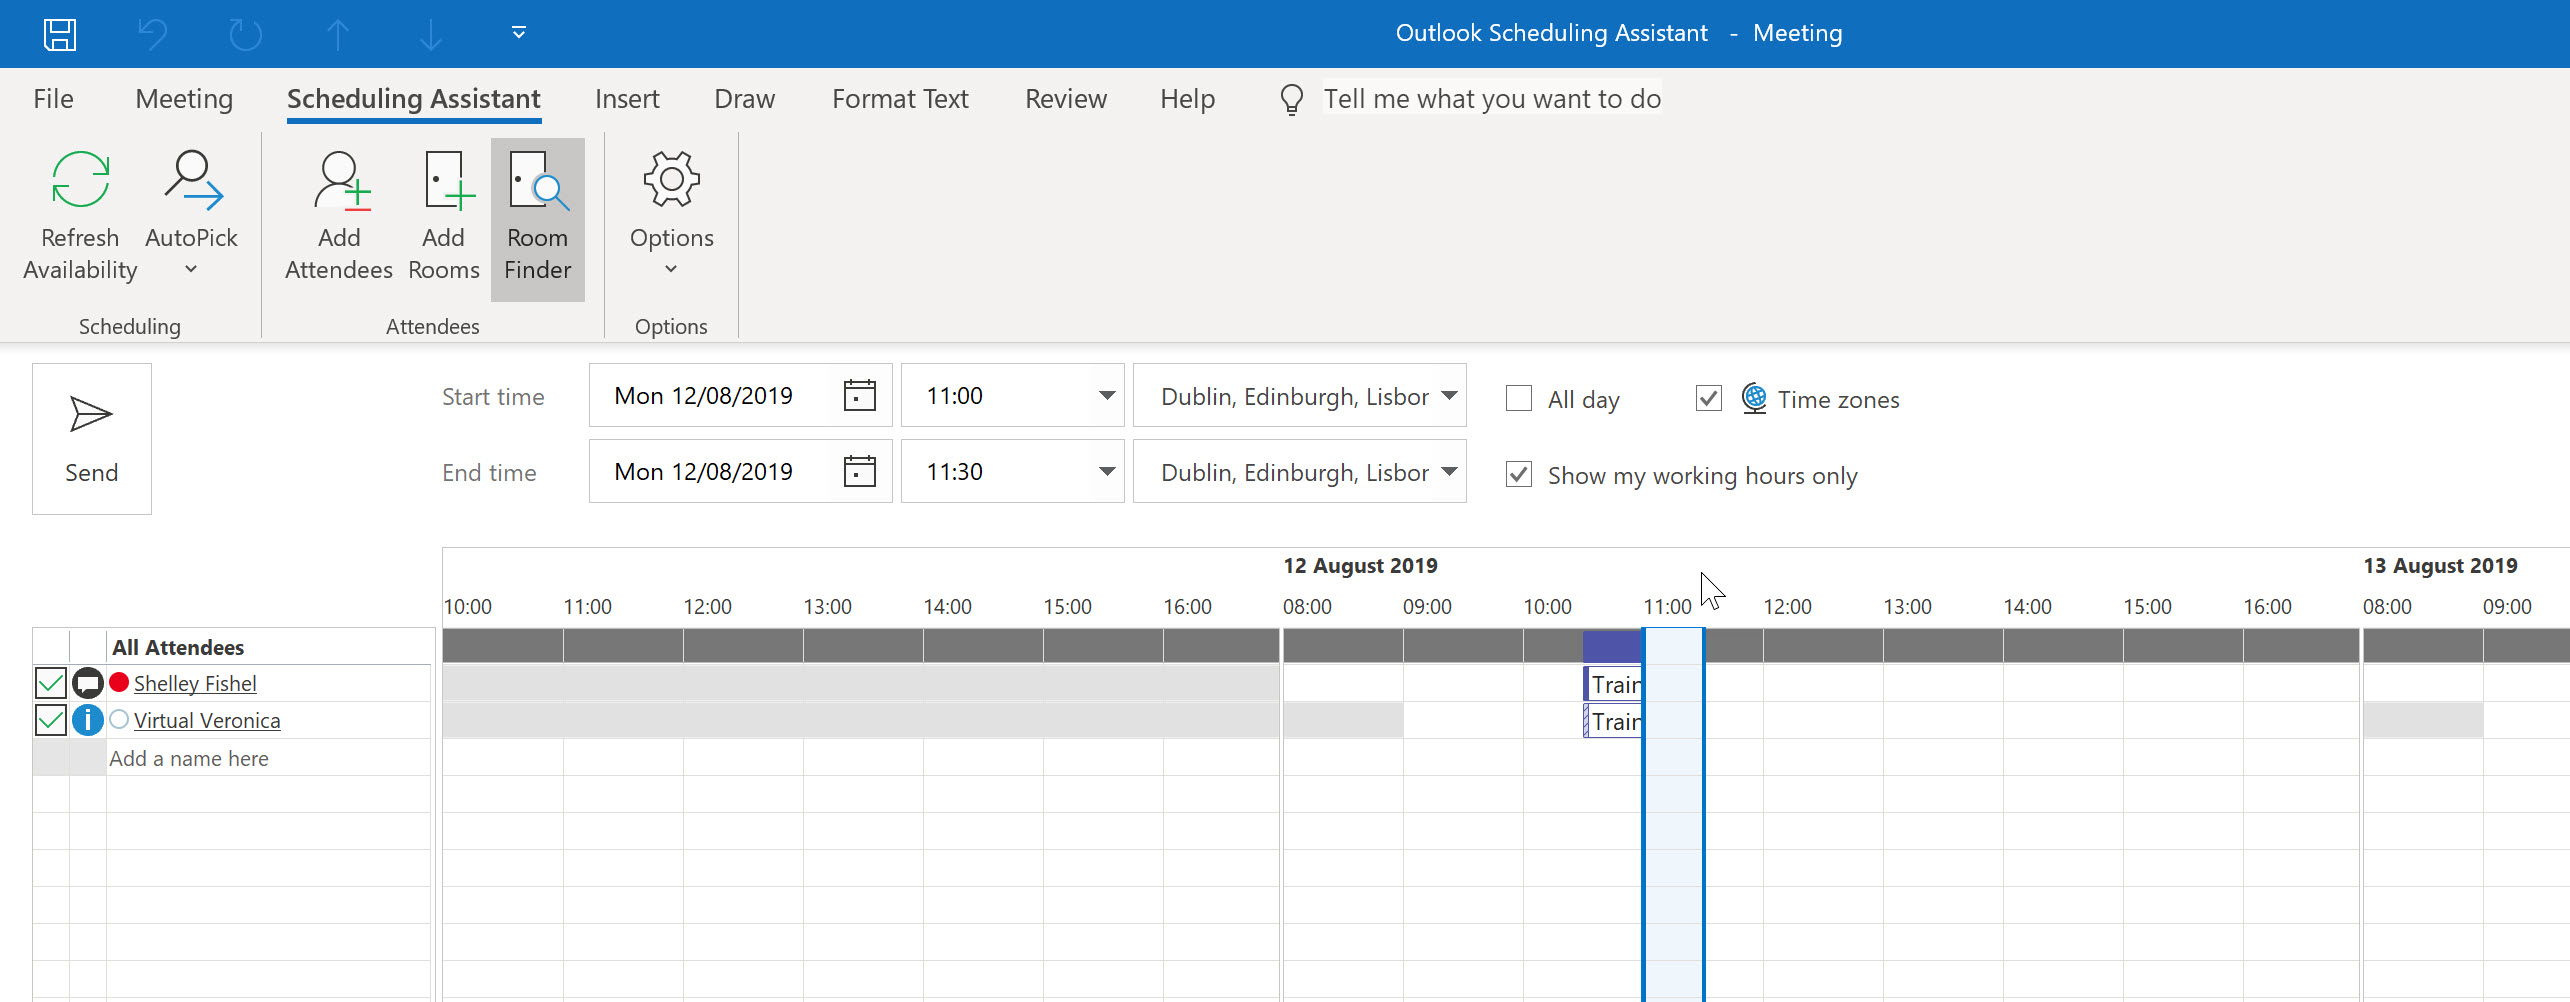
Once you are in the Scheduling Assistant screen, you will see a list of those invited along with a timeline showing you who is free and who is busy.

Here you can see:
Note that it only shows the schedules for people at your organisation – so anyone attending this meeting with @tomorrowsva.com in their email address. I can still invite others, who are not @tomorrowva.com however I won’t be able to check their schedule.
On the Scheduling Assistant Ribbon click the Auto pick next icon and Outlook will move the meeting to the next time slot where all attendees are available.
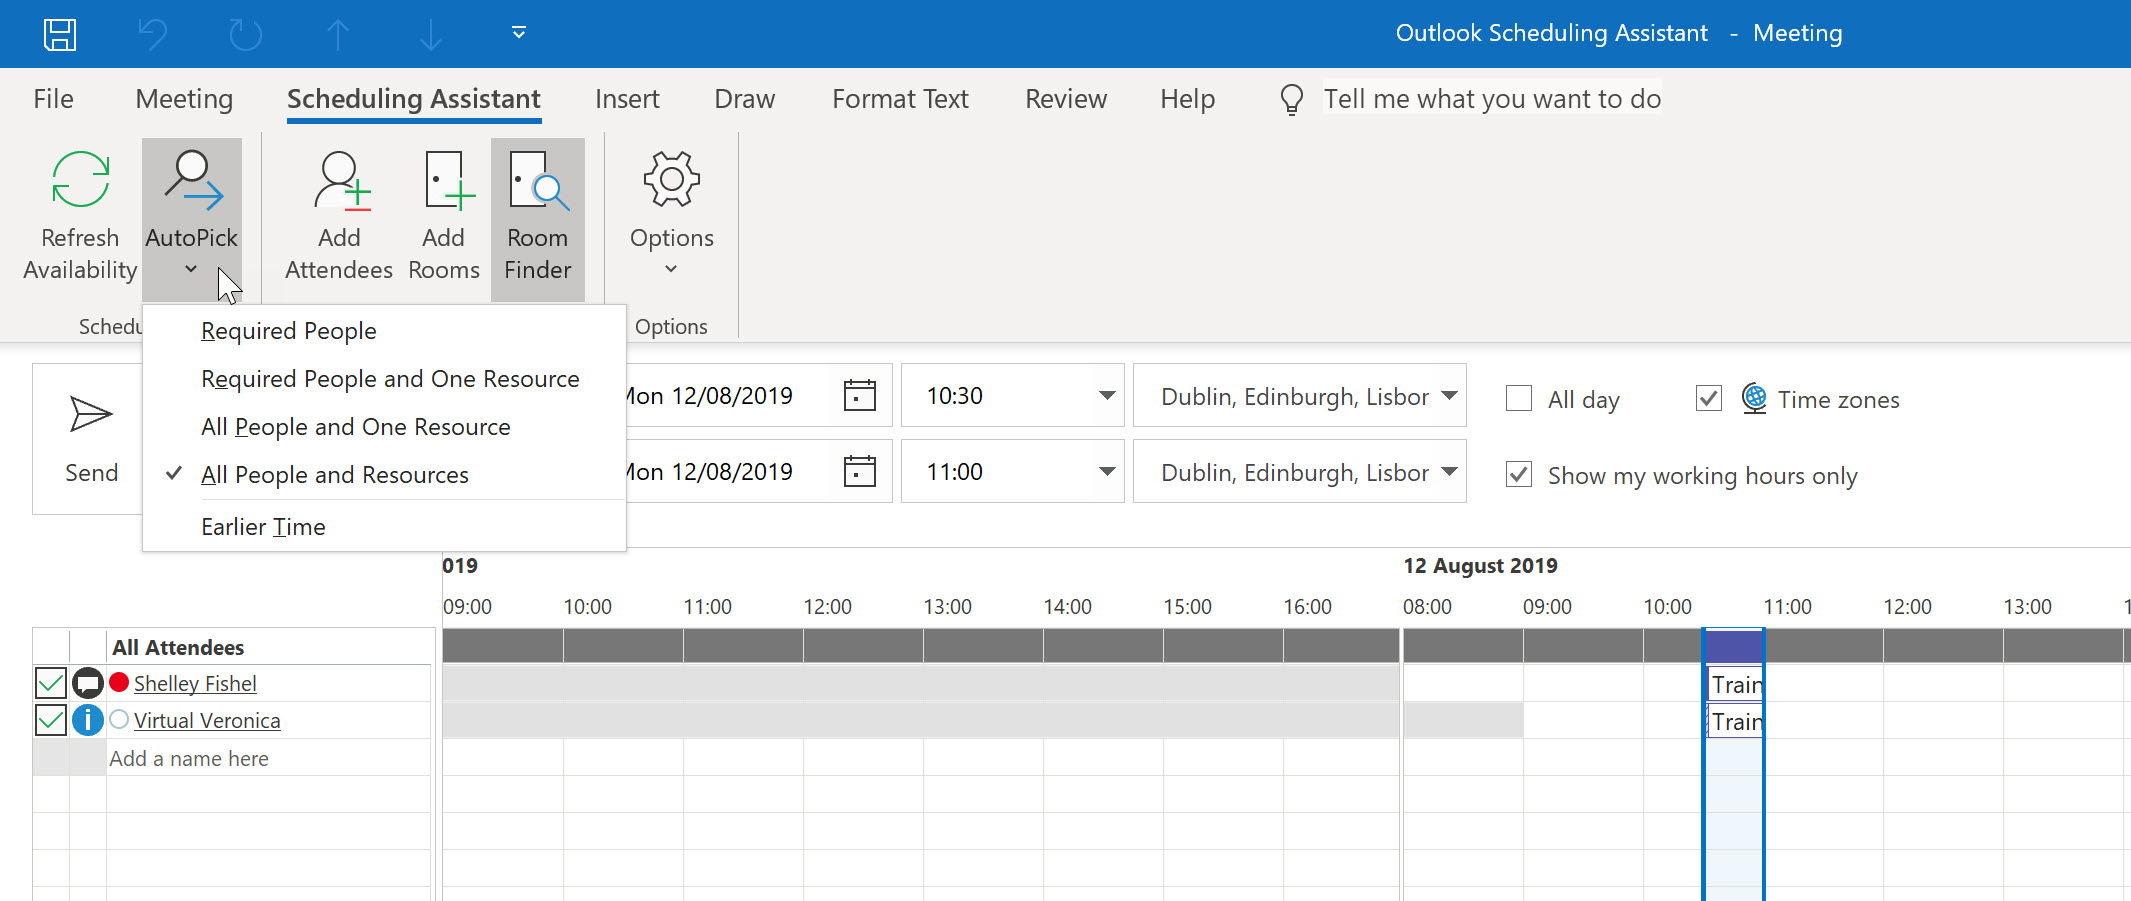
You will now be shown the next slot – in the image above I can see that 10:30 am is not the best time to meet up with Veronica so I will ask Auto Pick to find me the next free slot. The Scheduling Assistant now shows the next time we are both free – in this case 11 am.
You can continue to ask Outlook to AutoPick a new slot until you are happy with the meeting time. Alternatively you can drag the meeting to a new location or change the date and time manually. Click on the blue lines to select the meeting time and drag to the new location.
In case you want to add any more instructions or text to the body of the meeting request, click the Appointment icon. When you are happy with the meeting request, you can send it.
There is no AutoPick option so to change the meeting time, drag the meeting to a new time or change the time manually.
The first thing you will see is an email telling you how your attendee has responded
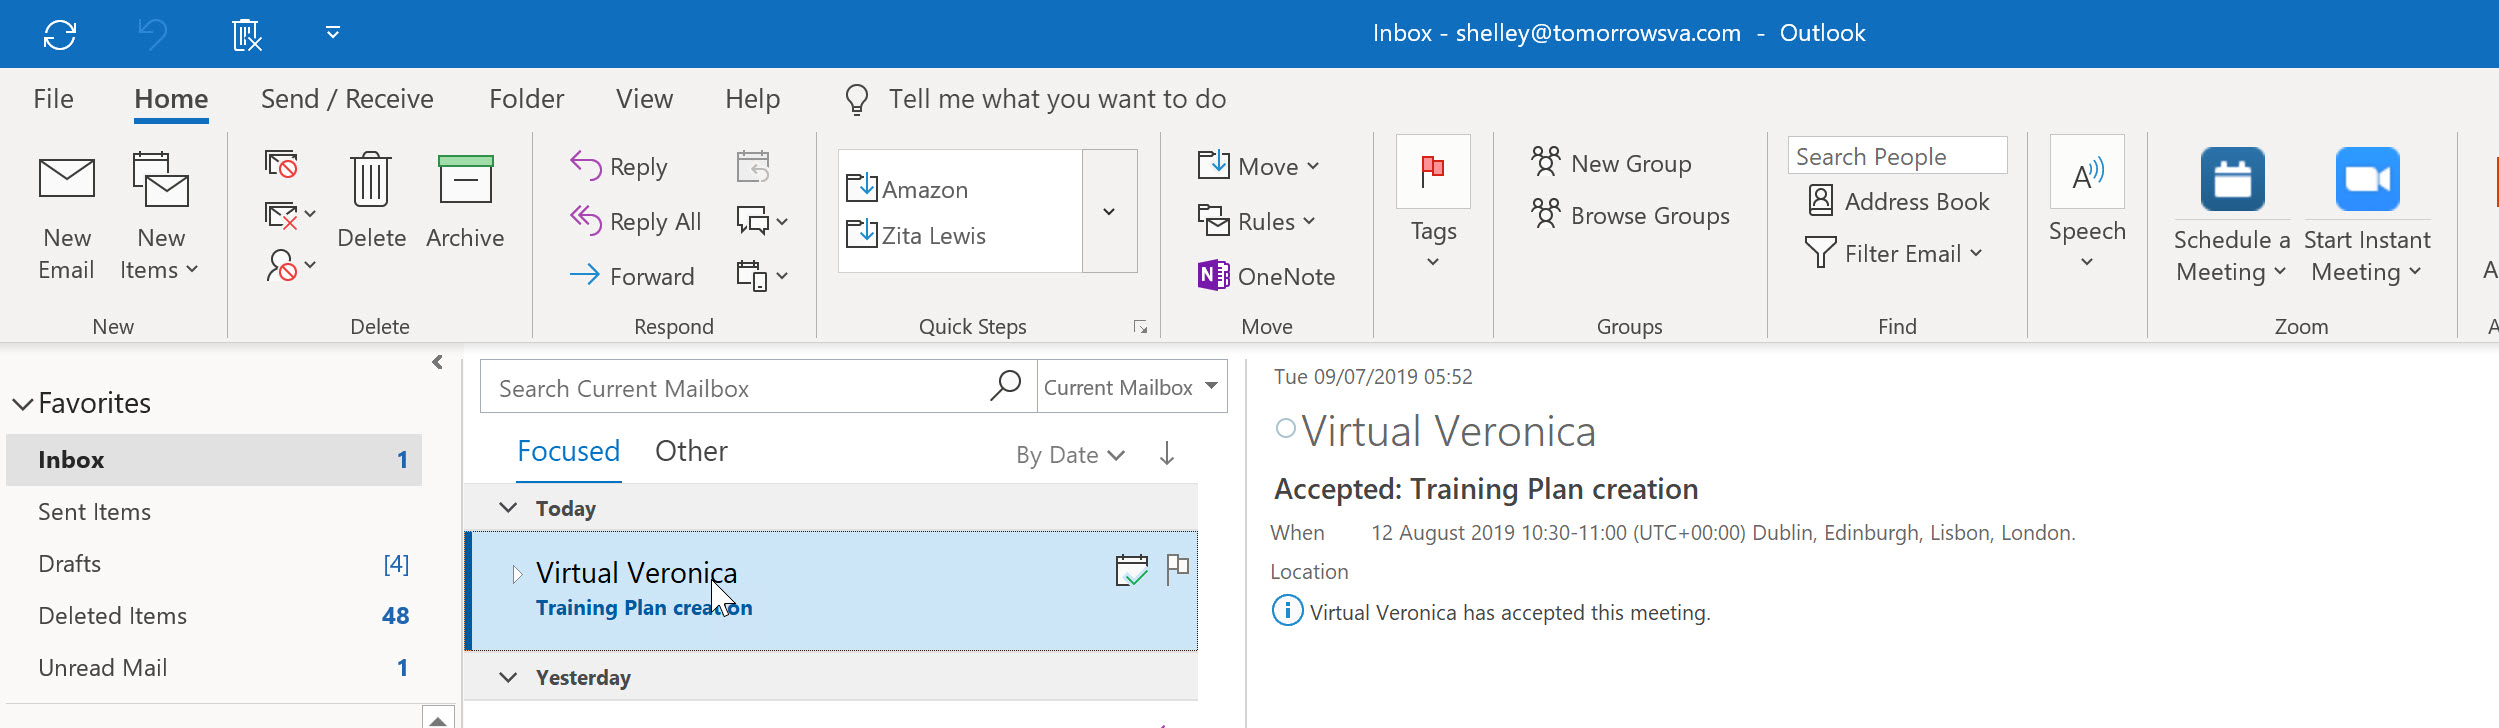
This can get lost quite easily in your Inbox as Inboxes can get VERY busy… To track the responses to your meeting invitation open the meeting in your calendar and click the Tracking Ribbon.

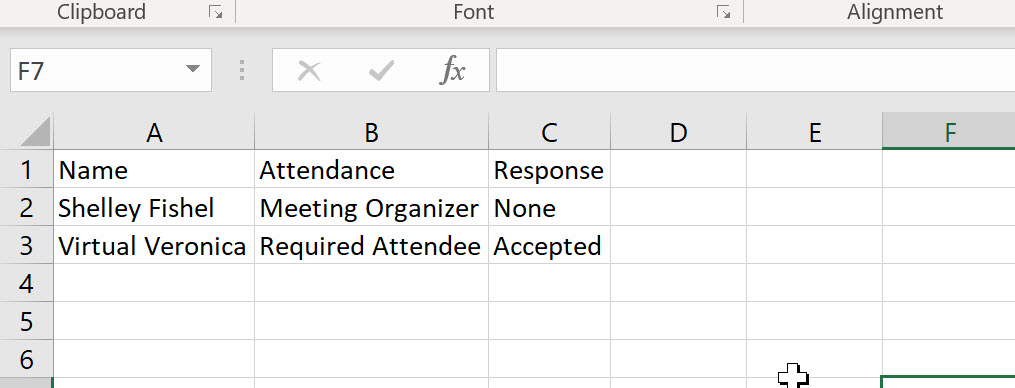
When you click Tracking, Outlook shows you a list of attendees and their responses.
Here you can see that Veronica has accepted and Shelley has had no response. No surprise there Shelley is the organiser!
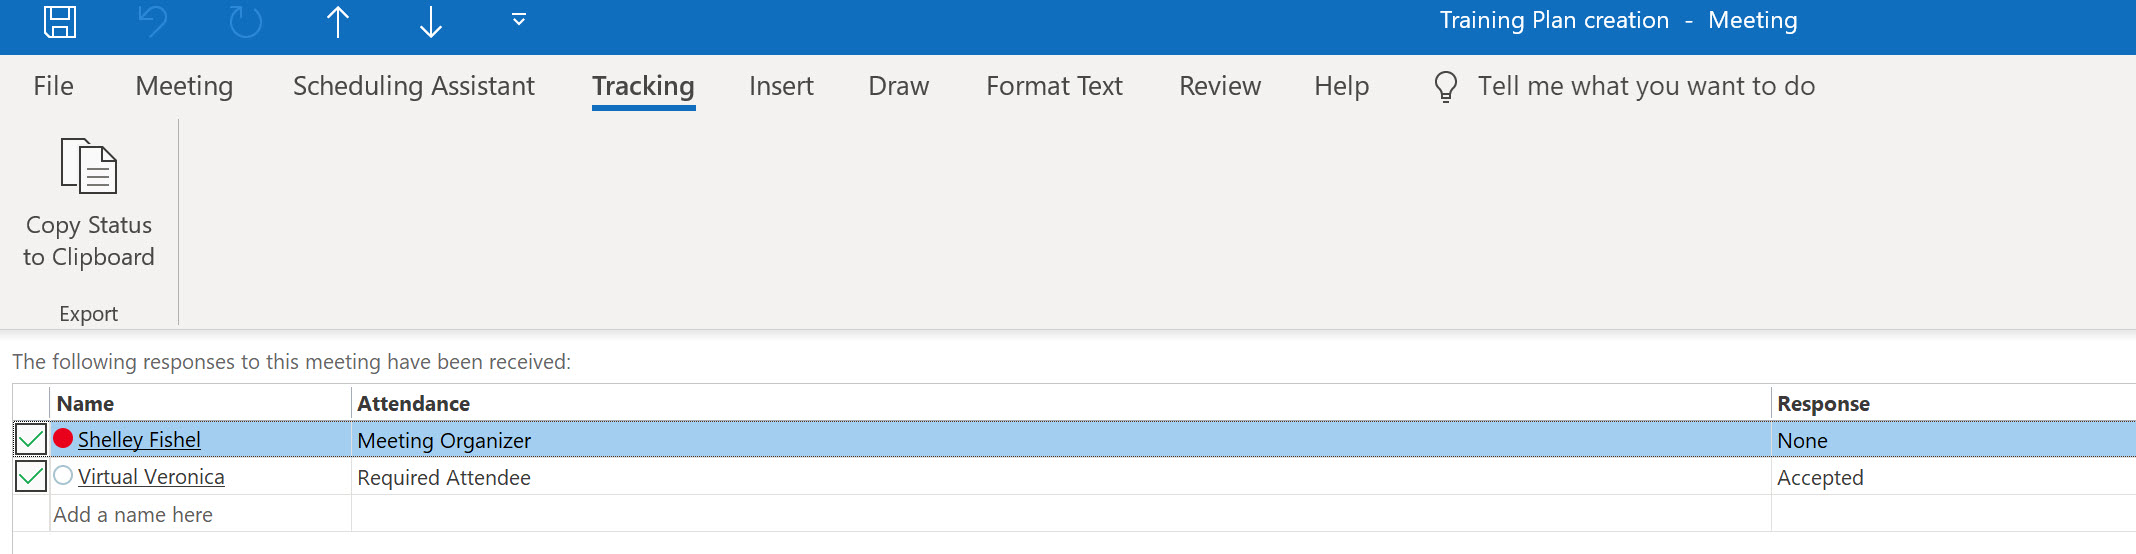
When you copy the tracking stats to the clipboard you can then paste it into a Word Table or an Excel Spreadsheet – you have a readymade checklist. Click the button to Copy Status to Clipboard and then open Excel and paste.
When you invite people to a meeting, they may not always be at the same organisation as you are. Even when you are not using the Scheduling Assistant as the Meeting Organiser you can still track the response from attendees. Click the Tracking Icon to see who is coming. Now that you can see the responses, you can nudge those who have not yet replied!
Using the Outlook Schedular you have saved time for yourself and those attending the meeting and significantly contributed to reducing email overload. Less stress and wasted energy leading to improved performance and well-bing.
Shelley Fishel is the founder of Tomorrow’s VA an online training academy for assistants.
Scheduler’s
Tags: Microsoft Outlook Scheduling Assistant, Reduce email overload, Shelley Fischel, Time management, Tomorrows VA
Reducing the vacation email overload is one reason why many business people refuse to switch off during their holiday. Nonetheless, all the research indicates that switching off from business email when on vacation improves your productivity and well-being.There are many ways to reduce and manage the vacation email overload. This is a topic we have written about on several occasions. Here are five top tips for 2019.

Reduce vacation email overload
Before you go
1) Go for inbox zero before you go on vacation. Make time the week before your vacation to create a clean inbox. Sort by person/project etc then use conversation mode to batch together all the email threads. Flag any which need your attention on your return. Then either delete the ones you really don’t need or move them out to a folder. Alternatively archive the lot (if you don’t have an automatic archiving system).
2) Treat your inbox as an information highway. Only let the really important emails into your inbox. As you clean the inbox, note the low priority emails you really do not need. Write rules to automatically folder them as they arrive (eg newsletters, cc’d emails, Out of Office messages etc.). Thus, keeping them out of the fast lane going directly into your inbox. Click here if you need help writing rules.
3) Set a simple clear Out of Message. Give the minimum of information to preying eyes (either cyber criminals or the competition). Just say you are out of the office with limited access to your email. Provide a point of contact for any urgent matters (having checked that the person is both available and happy to buddy up for you).
Set the OOO for one day before you go and two after your return. This gives you time to clear up and catch up and look supper efficient on your return!
On your return
4) Triage the inbox to identify the really important emails. Again, sort by person/project and use the conversation view to group the threads. Deal with the important emails which need your attention. Use the Pomodoro technique to deal with these in batches.
Accept that not all emails either need or warrant a reply. Once you’ve dealt with the essential ones, move the rest out into a holding (pending) folder. Check these at your leisure during the week. Then be ruthless, delete all the other emails which you do not need (eg conversations, cc’d emails). If they are important the sender will soon re-email you.
5) Create templates of text and automation reply quickly. If you find several emails need similar words in the reply (eg a holding response) create templates of text to help you save time retyping the same text. Click here to see how to use Quick Parts in Outlook. For Outlook users create a Quick Step for emails which need a repeat action, eg sending invoice to finance.
If you find these tips useful don’t forget there are many more like this on the Mesmo Consultancy Facebook and LinkedIn pages. Why not join us on or both one of these social media platforms. Also, there is Mesmo Consultancy’s Smart Email Management Workshop. Either click here or call us for more information.
Tags: Clean Inbox, email free vacation, inbox zero, Manage vacation email, out of office message, Reduce vacation email overload, Top tips to reduce reduce vacation email overload
Here are five top Outlook functions in OL 365 and OL 2013 onwards to improve your email management and help reduce email overload. Outlook 365 (and 2013 onwards) contains a myriad of time saving functions. However these five will enable you to take control of your day rather than have it controlled by the inbox. Hence, they will help you improve your well-being, productivity and performance.
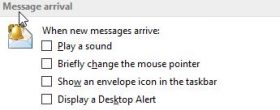
1) Switch off all new email alerts
Never again be distracted by each and every new email. Go to File/Options/Mail. Then untick all the boxes in the Message arrival pane.
If there are key contacts whose emails you do want to see as they arrive, then write a rule that alerts you to just these emails.
2) Create a task/calendar entry from an email
Don’t waste time creating a task or calendar reminder. Let Outlook do it automatically. Drag and drop the email from the inbox on either the Task or the Calendar icon. The appropriate box will open to allow you to create either a task or calendar entry.
3) Rules
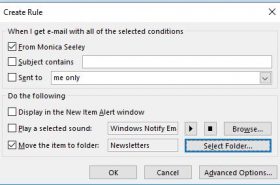
After you have triaged your inbox and decided which emails you really need to see in the inbox, use rules to filter out all the less important emails. To create a simple rule, right click on the email, select Rules/Create Rule and complete the Create Rule box by ticking the relevant boxes. For example, to send all emails from Monica Seeley to the Newsletter folder, just tick those two boxes as shown below.
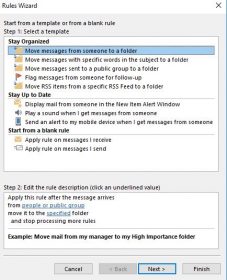
For more complex rules go to Rules/Manage Rules & Alerts (on the Home tab). Click on New Rule. Select the type of rule (from the Step 1 panes). Then complete Stage 2 by clicking on the hyperlinked phrases eg people. Click Next to continue to complete each option for the rule.
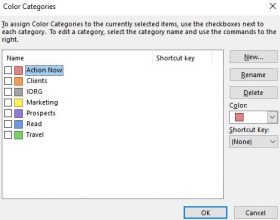
Use colour to help you spot important emails quickly and sort the inbox more efficiently too. Click on the Categories icon from the Home tab. The initial drop-down list just contains colour names. To customise the categories, click on All categories (bottom item). Use the Color Categories dialogue box to assign names to the various colour and add colours as required. For example, tick the Red box and then the Rename button and type the desired name eg Action Today.
How often do you need to write the same words in an email, eg acknowledge a CV, papers for a Board Meeting etc? Stop searching for the last email and cutting and pasting. Use Quick Parts to create re-useable templates of text and save time.
Type the text in question in a new email. Highlight it and click on Insert/Quick Parts/Save Selection to Quick Parts Gallery. From the drop-down menu pick Save.Give the template a name, then click OK.

The text is then saved and can be reused in future emails. To insert the text in a new email, click in the message area and go to Insert/Quick Parts and select the required text.
These are just some of the functions in Outlook 365 and 2013 onwards which will help you save time and reduce email overload. For more tips and hints like this why not book one of Mesmo Consultancy’s Smart Email Management Masterclasses for you and your colleagues.
Alternatively sign up for our monthly Email Management newsletter which provides tips and hints to help you save time dealing with email and reduce email overload.
Tags: email management, Email management to improve productivity, Email management to improve well-being, Outlook tips to save time, Reduce email overload, Take Control of Your Inbox